A Trip to Death Valley National Park

In 2026, I continued my quest to visit as many of the US national parks as possible before I die. I had the opportunity to join a group of photographers in Death Valley, where I spent five days traveling, hiking, camping, and photographing in the largest park in the contiguous United States.


Death Valley is the hottest, driest, and lowest of all national parks in the US. Straddling the California-Nevada border, it features an incredibly diverse landscape of dunes, valleys, canyons, and mountains. Over five days, we traveled from the basin’s salt flats to high overlooks, across badlands, and into a cool spring oasis. The park is a study in contrast, from the lowest to the highest, from bone-dry playa to secret water, and from raw geology to human stories. UNESCO included this landmass in its Mojave and Colorado Deserts Biosphere Reserve in 1984.


The Devil’s Golf Course


We knew that winter rains had caused a superbloom in the park this year. This rare, once-a-decade event is driven by heavy winter rain. The desert floor is transformed into carpets of yellow, purple, and white wildflowers. With this in mind, our first stop was at the Devil’s Golf Course.


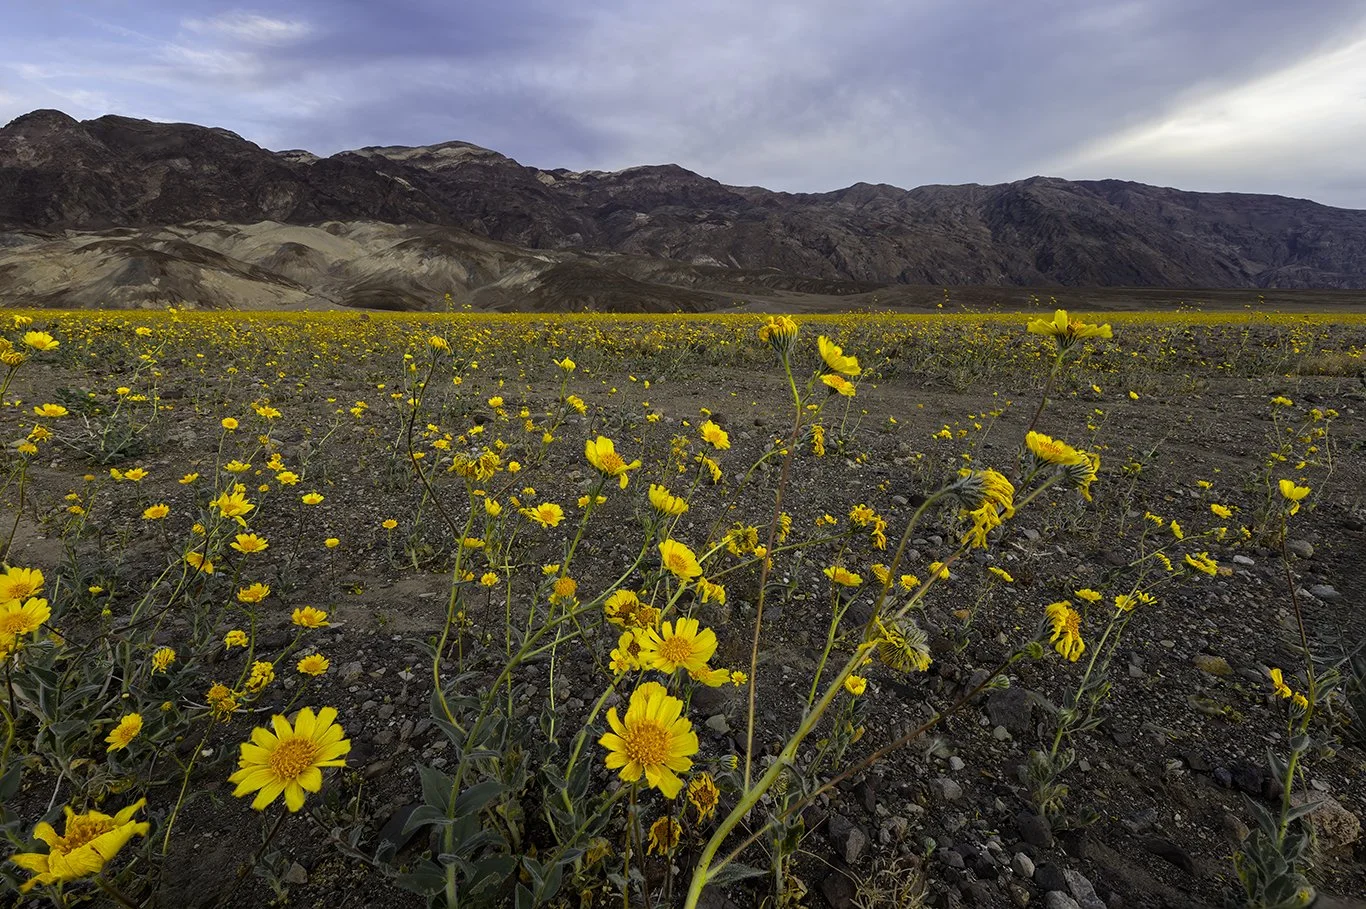
Situated between Furnace Creek and Badwater Basin, this expansive, rugged salt pan features jagged, knee-high halite salt-crystal formations. The area is so named because it’s believed only the devil could play golf on its rough surface.


As we approached this area, the first thing we saw was a tapestry of Desert Gold. Also known as desert sunflowers, these bright yellow, daisy-like flowers are abundant and blanket the valley floor.
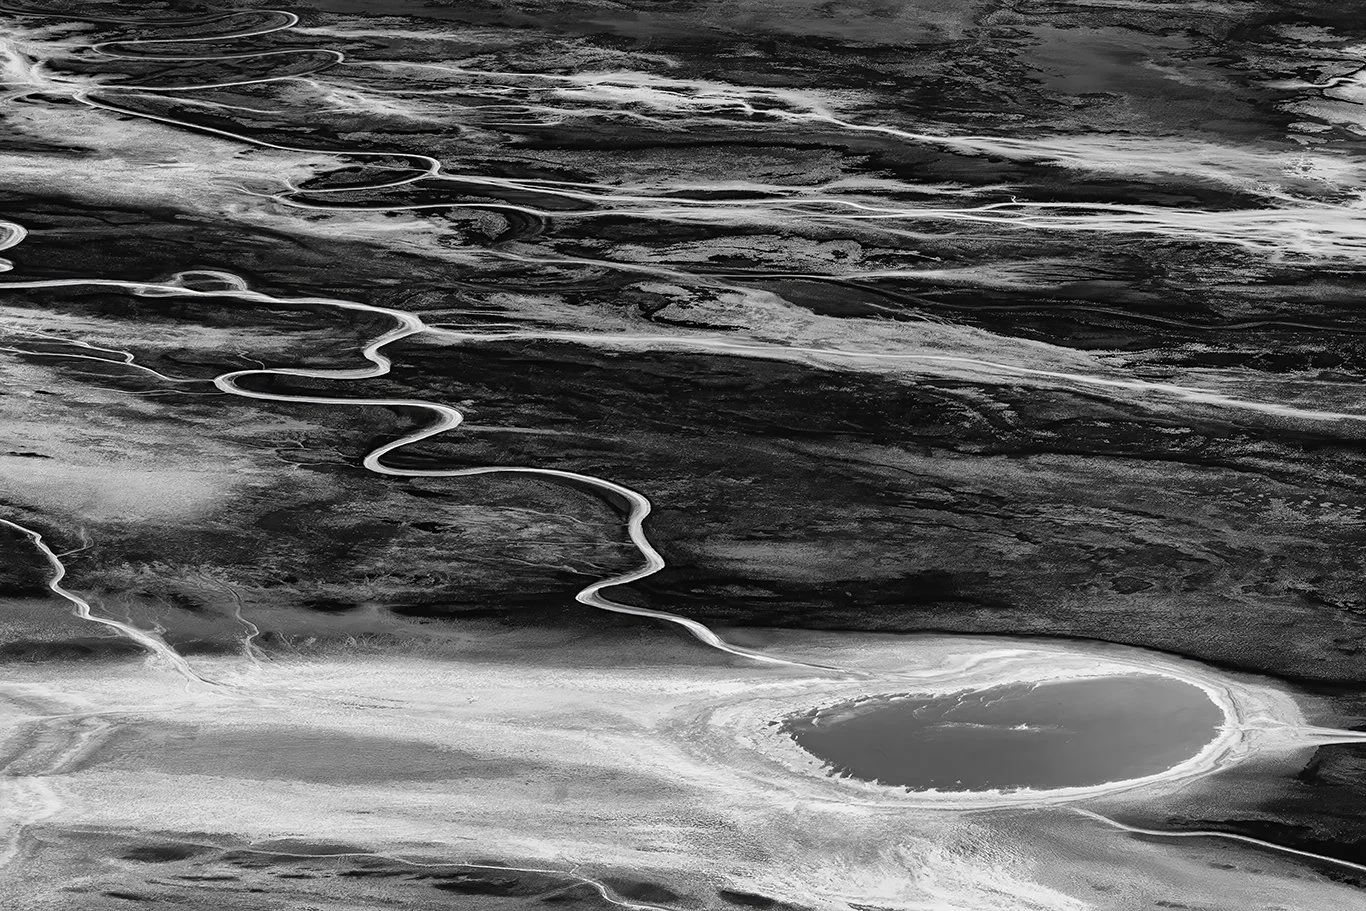
Badwater Basin


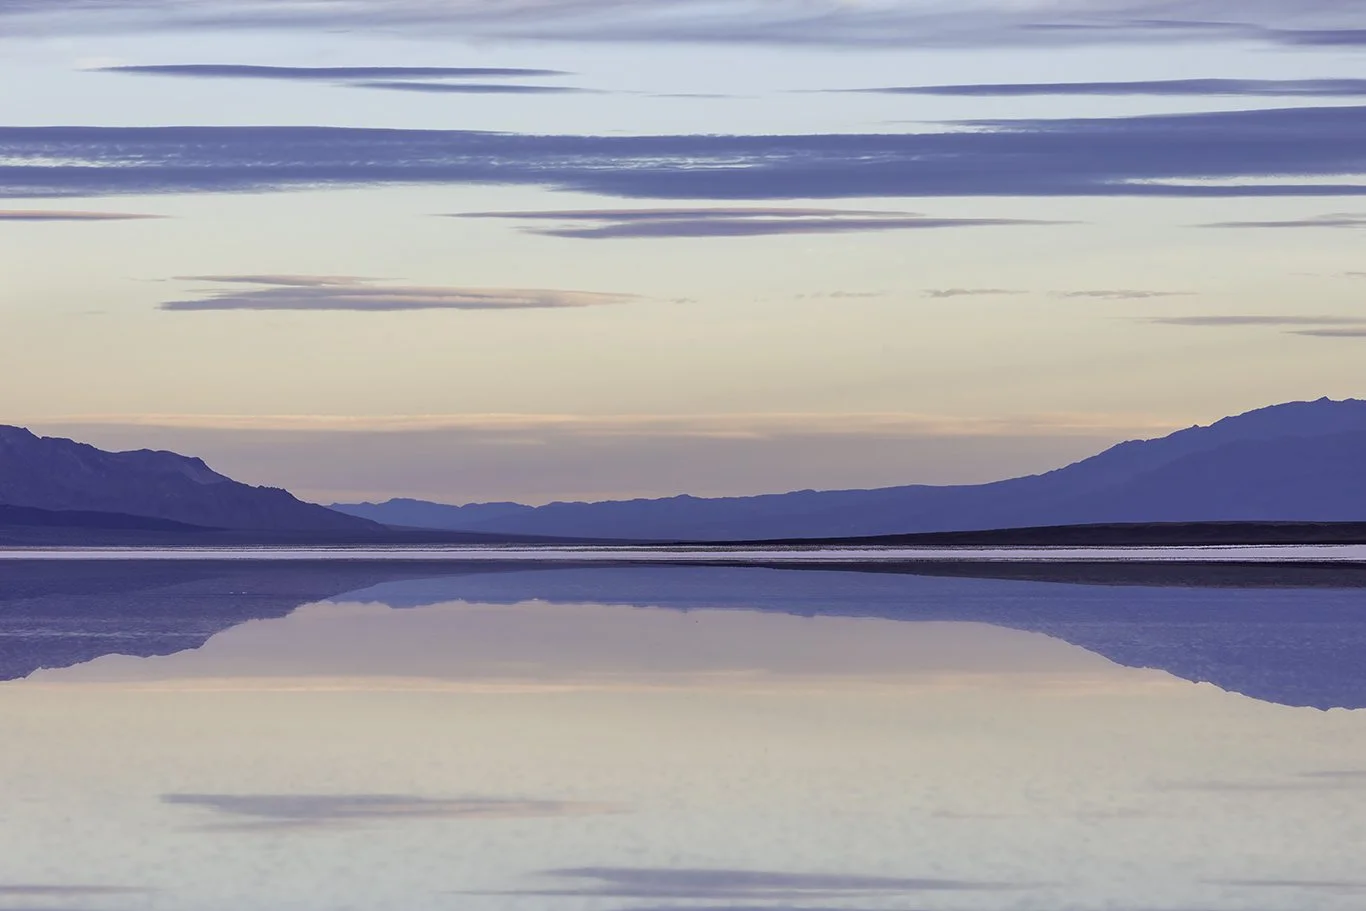
It’s very early in the predawn hours when my alarm goes off, and I have a cup of coffee in my hotel room. The goal for this morning is to photograph the Badwater Basin, the lowest point in North America, at 282 feet below sea level. This is a large, flat playa with a broad, nearly level lakebed that spans several miles. Fine sediments accumulate on the surface of the playa, where polygonal salt-crust patterns form in ridges of desiccated mud. Having anticipated the type of terrain we would be trudging through, I wore mud boots over my hiking shoes, and I was glad I did.


The topography and geology of this area are amazing. The playa is framed by steep alluvial fans, with the Panamint Range to the west. This creates dramatic vertical contrasts that offer strong compositional opportunities.


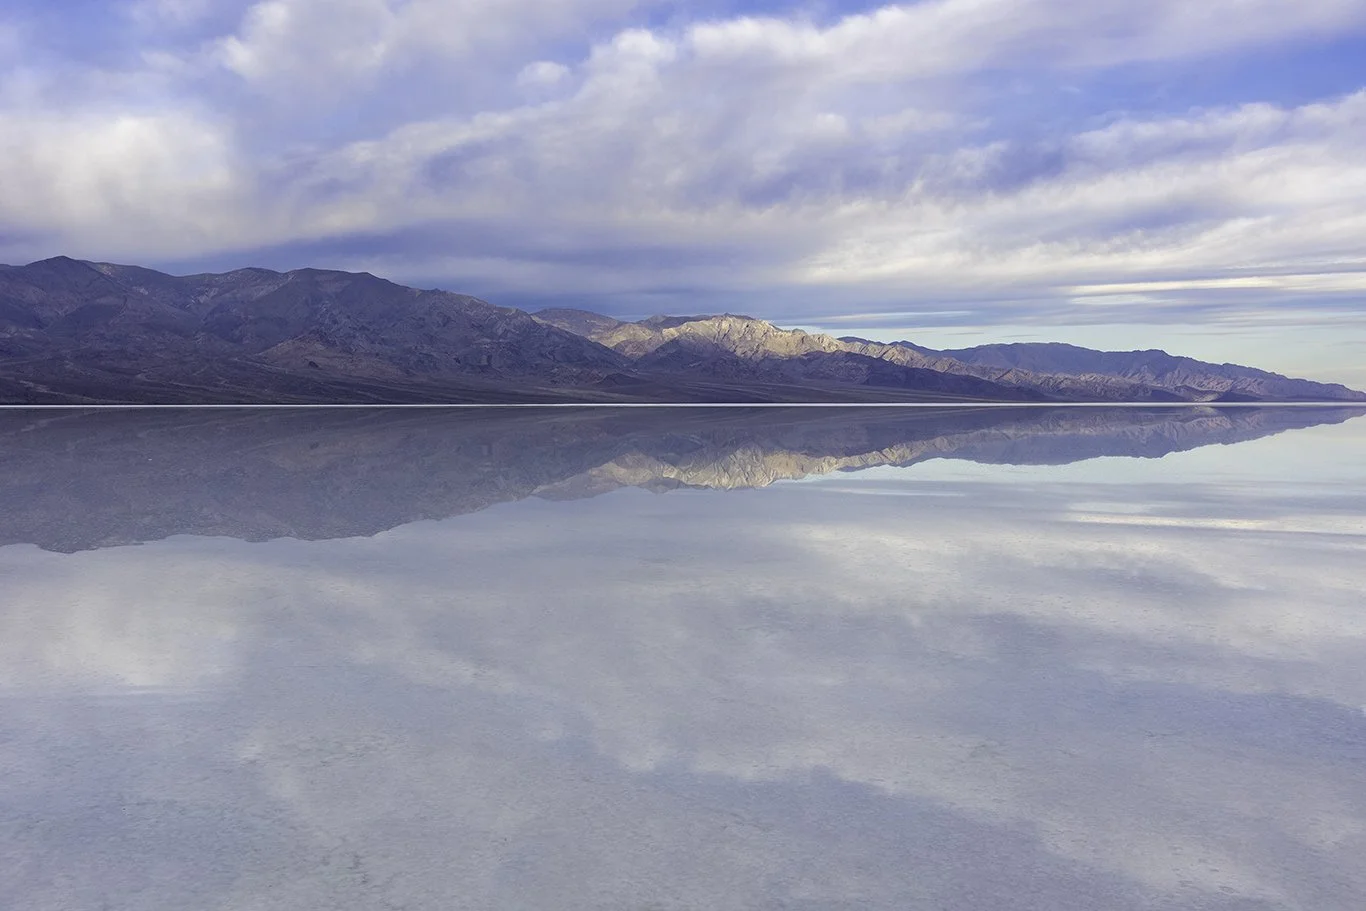
The way the playa forms involves ephemeral lake dynamics. In wetter periods or following storms, runoff and subsurface flow collect in the basin, forming shallow, temporary pools. The water evaporates rapidly in this hyper-arid climate, leaving behind dissolved salts and minerals. With repeated wetting and evaporation cycles, halite salts become concentrated, and as the surface dries, it cracks into hexagonal salt polygons that range from a few inches to a foot or more across. As multiple layers of crust are laid down in cycles over time, a thick playa sequence is formed.


As 8:30 AM approaches, we are starting to lose the light. Also, numerous tourists are starting to arrive in droves. It is time to go for breakfast.
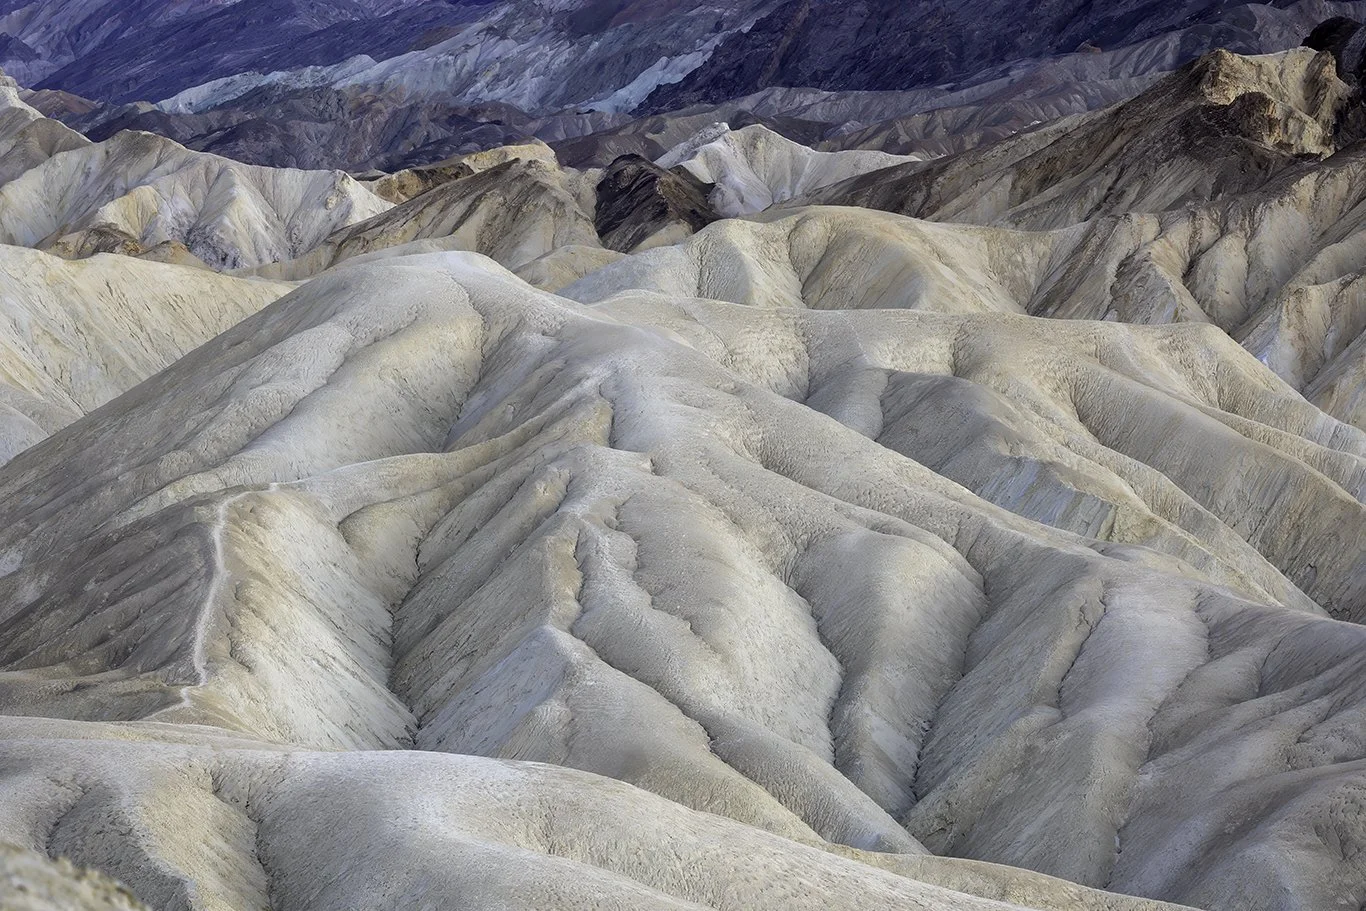
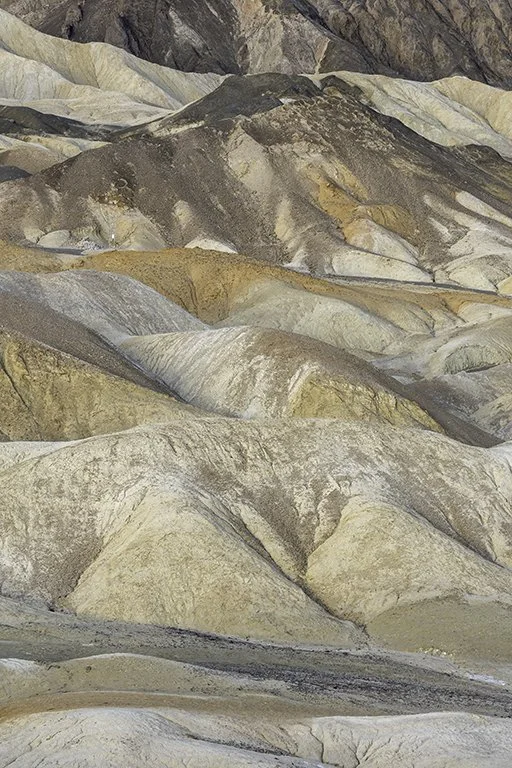
Zabriske Point


It is time to head to Zabriske Point for our afternoon shoot. This is one of Death Valley’s most iconic overlooks. It is a compact badlands area with sharply eroded, colorful clay and silt layers, offering sweeping views across Furnace Creek and the valley floor.


This site gained notoriety among tourists and photographers after the 1970 movie Zabriske Point was released. It was named for Christian Brevoort Zabriskie, vice president of the Pacific Coast Borax Company in the late 19th and early 20th centuries. The company and Borax mining helped shape early Euro-American activity in the area through the use of 20-mule teams and the Harmony Borax Works. The name stuck in local and park usage.


As we set up our tripods and cameras, the badland morphology reveals steep, dissected ridges, gullies, and narrow benches carved by episodic water erosion in fine-grained sediments. The result is a topography that appears sinuous, with abundant small-scale texture.


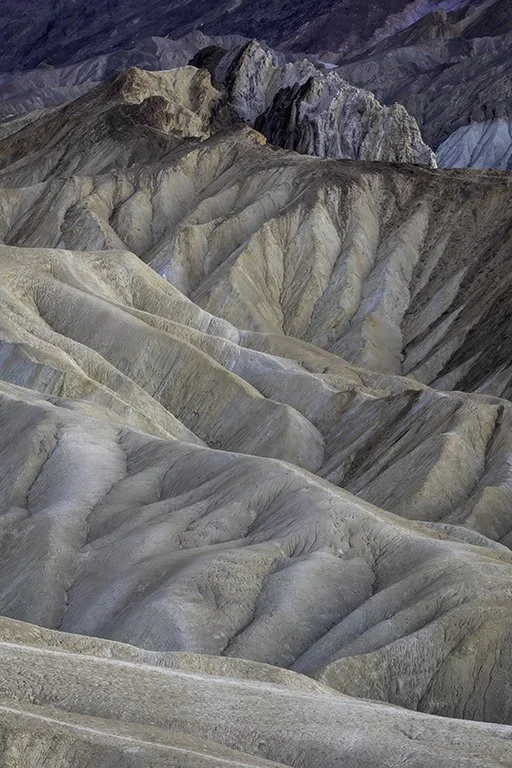
Zabriske Point is a challenge for photographers. Because of the hyper-arid climate, summers are extremely hot, with temperatures regularly exceeding 100 degrees. Accordingly, the best times to visit are October through April. The optimal times for photography are sunrise and the hour after, and late afternoon through sunset. Low-angle sidelight helps sculpt the ridges and saturates color, resulting in beautiful, soft pastels.

20 Mule Team Canyon


It’s the next morning, and we’re up at 4:00 AM to make it to our morning shoot at the 20 Mule Team Canyon. We gather our equipment outside the hotel and head in two vehicles to the east side of Death Valley National Park, near the Old Harmony Borax Works. We arrive at the parking lot and hike with our equipment to a steep overlook where we can set up our tripods and cameras before other tourists arrive.

This area exhibits classic badland morphology, with steeply eroded hills, ridges, narrow gullies, and winding canyons carved into siltstones, clays, and volcanic layers. Over millennia, erosion has formed sharp ridgelines, amphitheaters, and sinuous drainage channels.


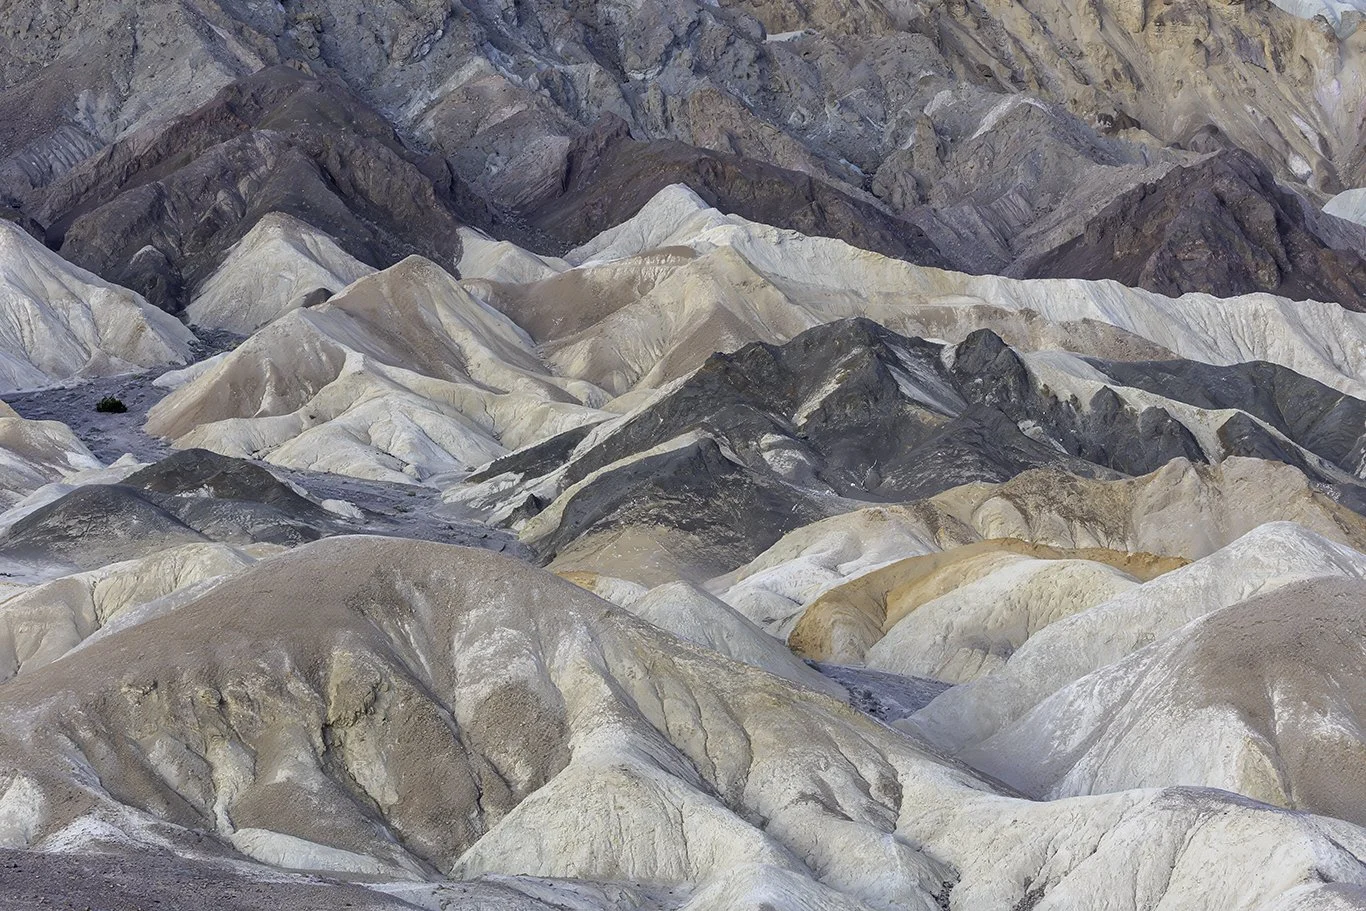
The history of this area is quite interesting. In the 1880s-1890s, the famous 20-mule teams hauled borax from the Harmony Borax Works at Furnace Creek to the railroad at Mojave. The borax industry was central to Death Valley’s Euro-American industrial economy.


This canyon had been used by the Timbisha Shoshone tribe for more than 1,000 years until the Death Valley National Monument was established in 1933. By the late 19th century, borax operations brought industrial mining, wagon roads, and the iconic mule-team era, which shaped regional settlement and storytelling. 


It is light out now, and we begin blue hour shooting before sunrise. It is windy today, and no matter how many times I try to secure my hat, it blows off my head and settles in a steep gully about thirty yards from our perch. This is a problem because it is hot and sunny in Death Valley, and no hat means scalp burn and overheating. Matt, our professional group leader, tells me to make our photographs now while the light is good, and we’ll deal with the hat later.


My photographs today are all taken with a 400mm lens to focus on the canyon's topography. As the sun rises, beautiful, thinly bedded sediments rich in iron and clay minerals produce vivid banding. The terrain is composed of ochres, reds, pinks, grays, tans, and creams, all accentuated by surface staining and differential weathering.


As we start to lose the light, it’s time to pack up and head out for breakfast, but not before something is done about my misplaced hat. In addition to being a professional photographer, Matt is a prodigious mountain climber, having scaled all of Colorado’s high peaks. He inches his way down the steep ravine, grabs my hat, and climbs back up the ridge without falling and without a rope. I’m forever grateful!

Ibex Dunes


We pile into our vehicles and drive about twenty miles to our camp near the Ibex Dunes. The road, located on the park’s southern border, becomes gravel and quite rugged. Our tents are already pitched for sleeping, and there is a larger tent for gathering and eating. In March, the climate in this area is usually quite pleasant. However, with global warming, temperatures this week are in the 90s, making the long hikes required to reach the dunes challenging.


The goal of the first day is to hike to the dunes for sunset photos. To get there, we trudge about two miles with our camera backpacks in tow, first across a long playa. The surface is quite jagged, composed of sand grains derived from a mix of granitic, volcanic, and metamorphic rocks.

Once through the playa, we reach sand that is easier to traverse. With about 45 minutes to go, the dunes come into view. These dunes are part of a large, wind-driven system that developed as the regional climate dried and the basin-and-range landscape evolved. Over tens of thousands of years, sediments from surrounding highlands, including sand, silt, and finer particles, have been eroded, transported, and concentrated in low-lying basins and along margins where wind speeds drop.


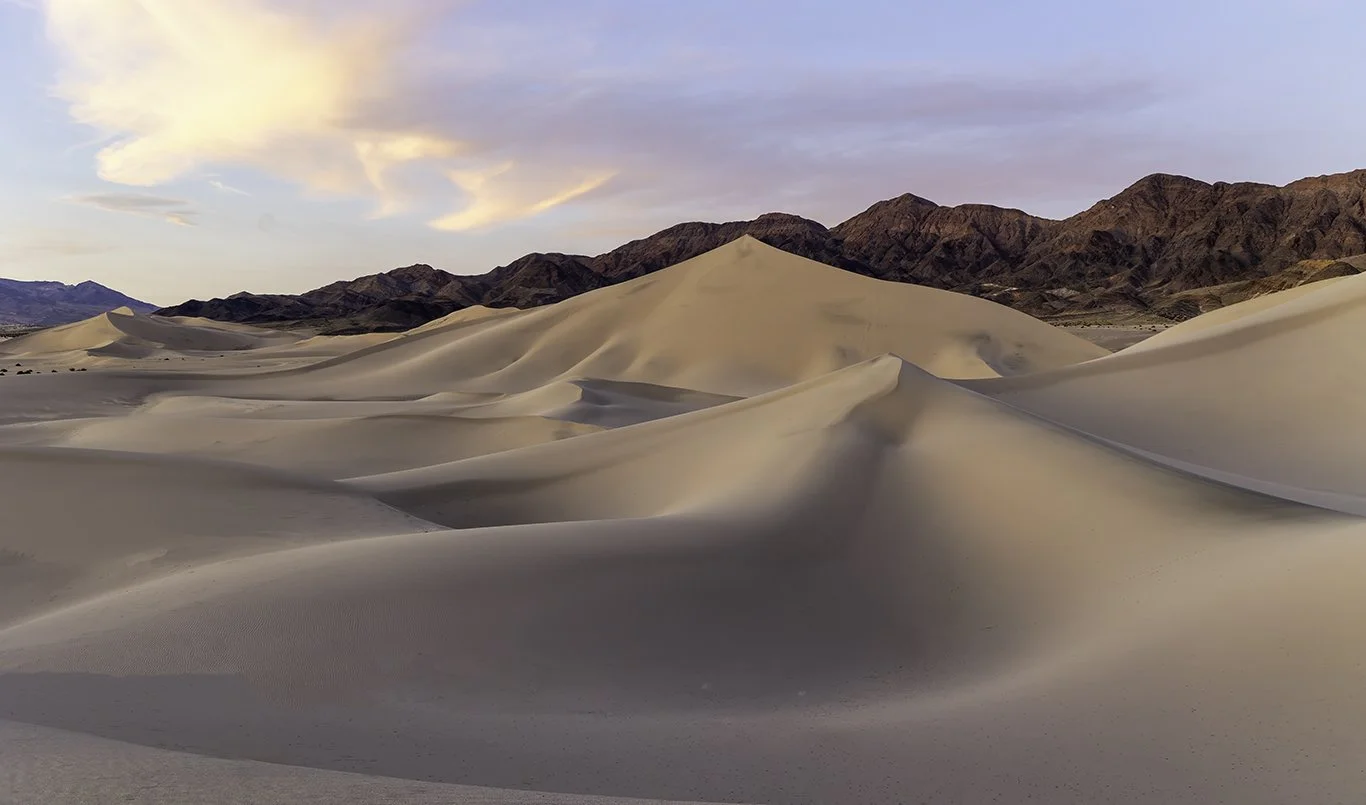
We set up our tripods and are now ready for golden hour. Late-afternoon and sunset light from the west produces rich color saturation and dramatic side lighting on the windward faces. In twilight, the dunes take on an abstract look, with soft tonal gradients and cooler hues.


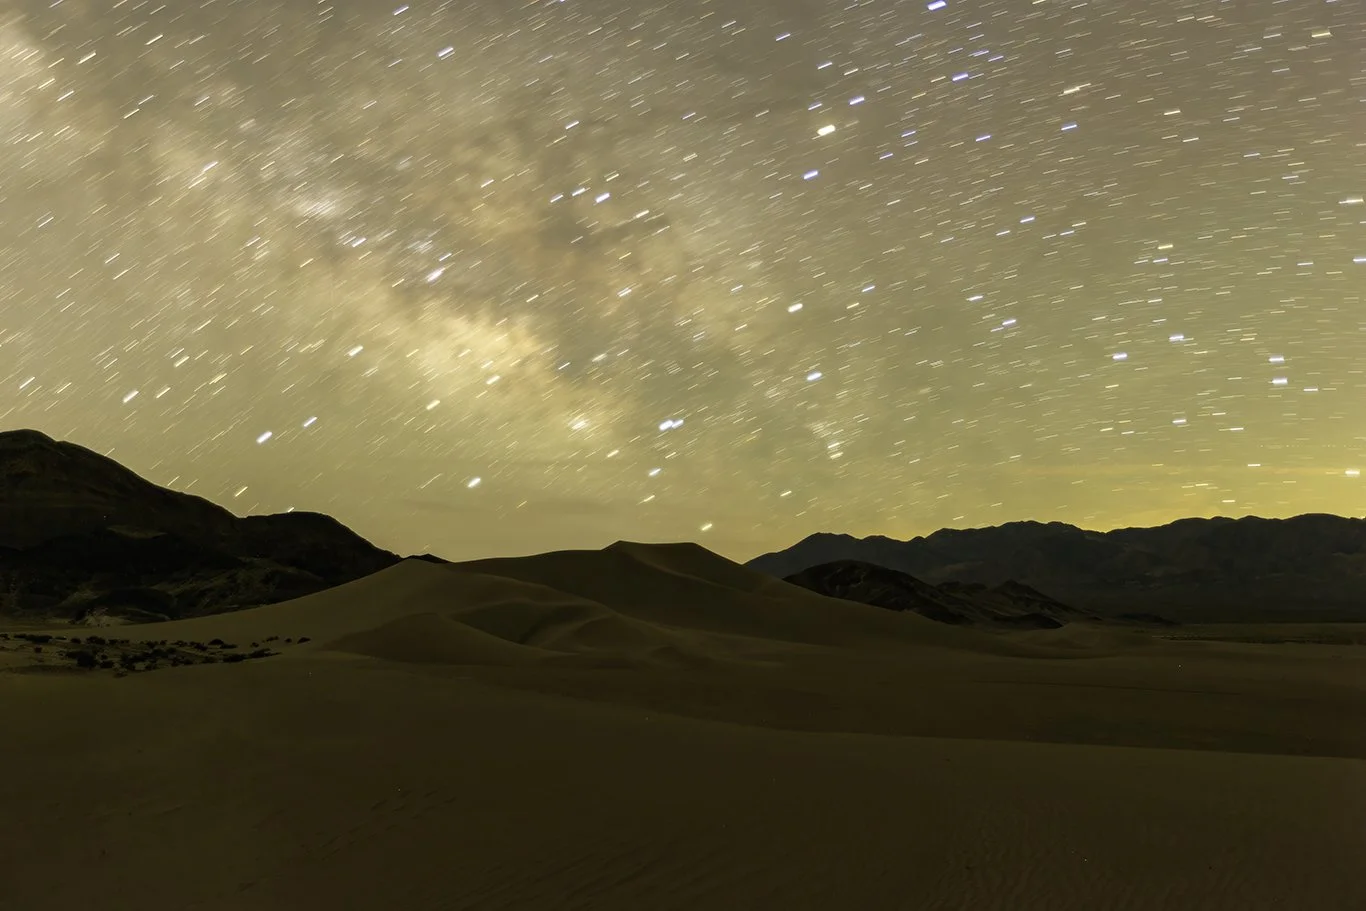
We trek back to the campsite, have dinner, and hit the sleeping bags for a little rest before our next day’s photoshoot. We leave the campsite at 3:00 AM to reach the dunes for astrophotography. I’m a neophyte at this and get a lot of help from the pros. With special software, Matt has determined the best time and place to photograph the Milky Way. I find this very challenging because, while shooting long exposures in the dark, one must avoid using headlamps to see. Going by sense of touch, you have to know your camera extremely well. To get competent at this, I’m told there are workshops devoted to astrophotography. I guess this discipline is for people who do not need much sleep!


It is starting to get light out as we have entered blue hour. We plod through the sand to set up for our morning dune shoot. Sunrise brings low, warm light from the east that sculpts ripples and casts long shadows across the lee sides of dunes. The lighting is perfect for bringing out a beautiful variety of forms, including small, curving crescent ridges and wind-scoured ripples that change character dramatically with the sun and the wind.

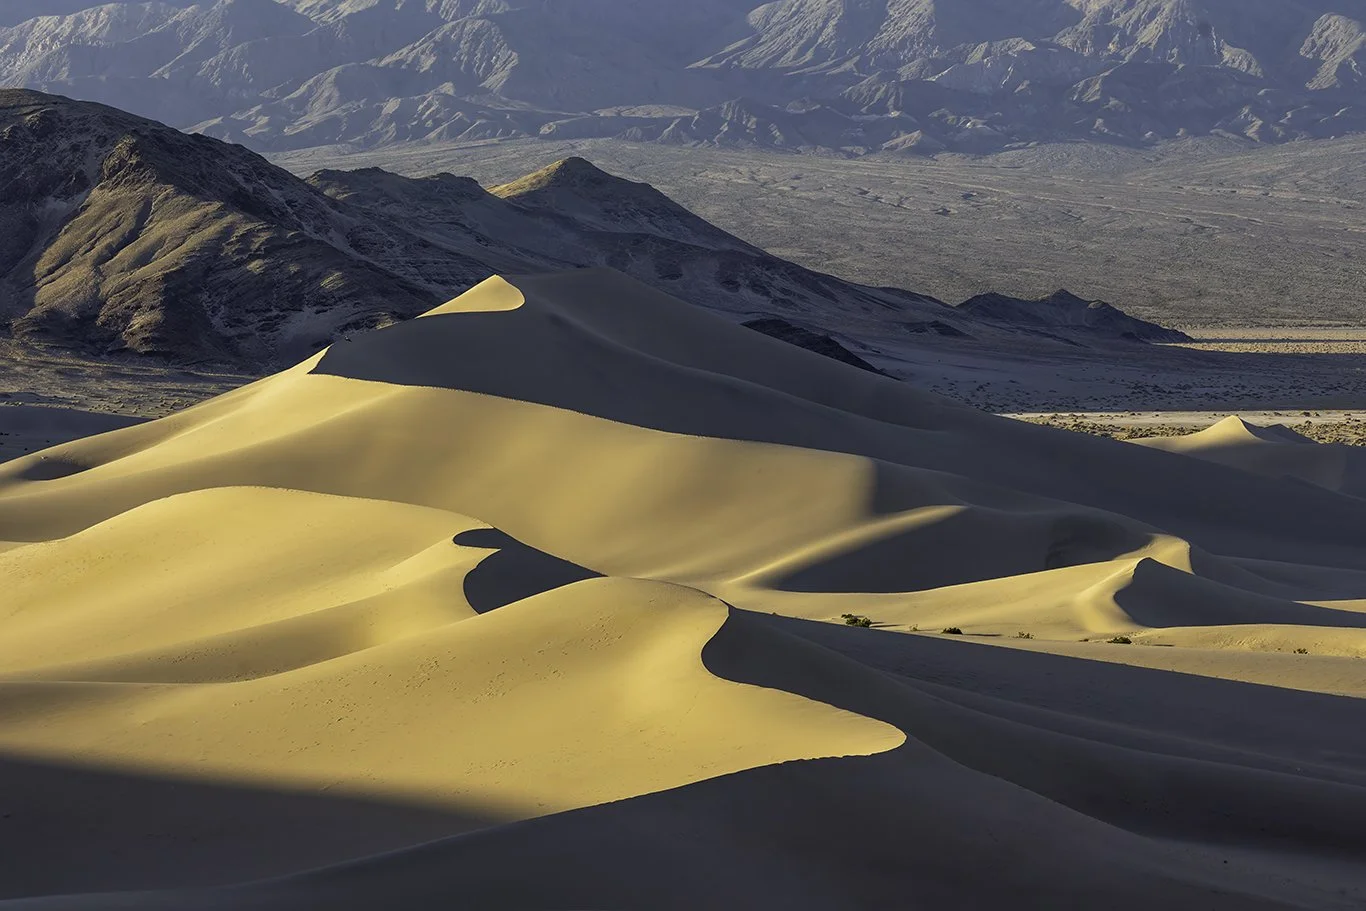
I’ve loved photographing the Ibex Dunes. However, after two nights of camping in ninety-degree heat, I’m ready to head back to the motel for a shower.

Dante’s View


We’re nearing the end of our survey of Death Valley, and we head to Dante’s View for our twilight shoot. Perched at 5476 feet above sea level, we reach the parking lot in the Black Mountains, offering a panoramic view of Death Valley below. From this overlook, both Badwater Basin and the Panamint Range are in view.


While long known to indigenous peoples, the site was adopted by Euro-American visitors in the early 20th century as Dante’s View, invoking Dante’s Inferno imagery of the valley below. The outlook became increasingly popular as auto access improved between the 1920s and 1950s.


We hike along a narrow ridge to stake out a good photographic vantage point. However, as sunset approaches, we have to move and change our spot because the group is being feasted upon by some kind of biting insect. Fortunately, the second site is much better.


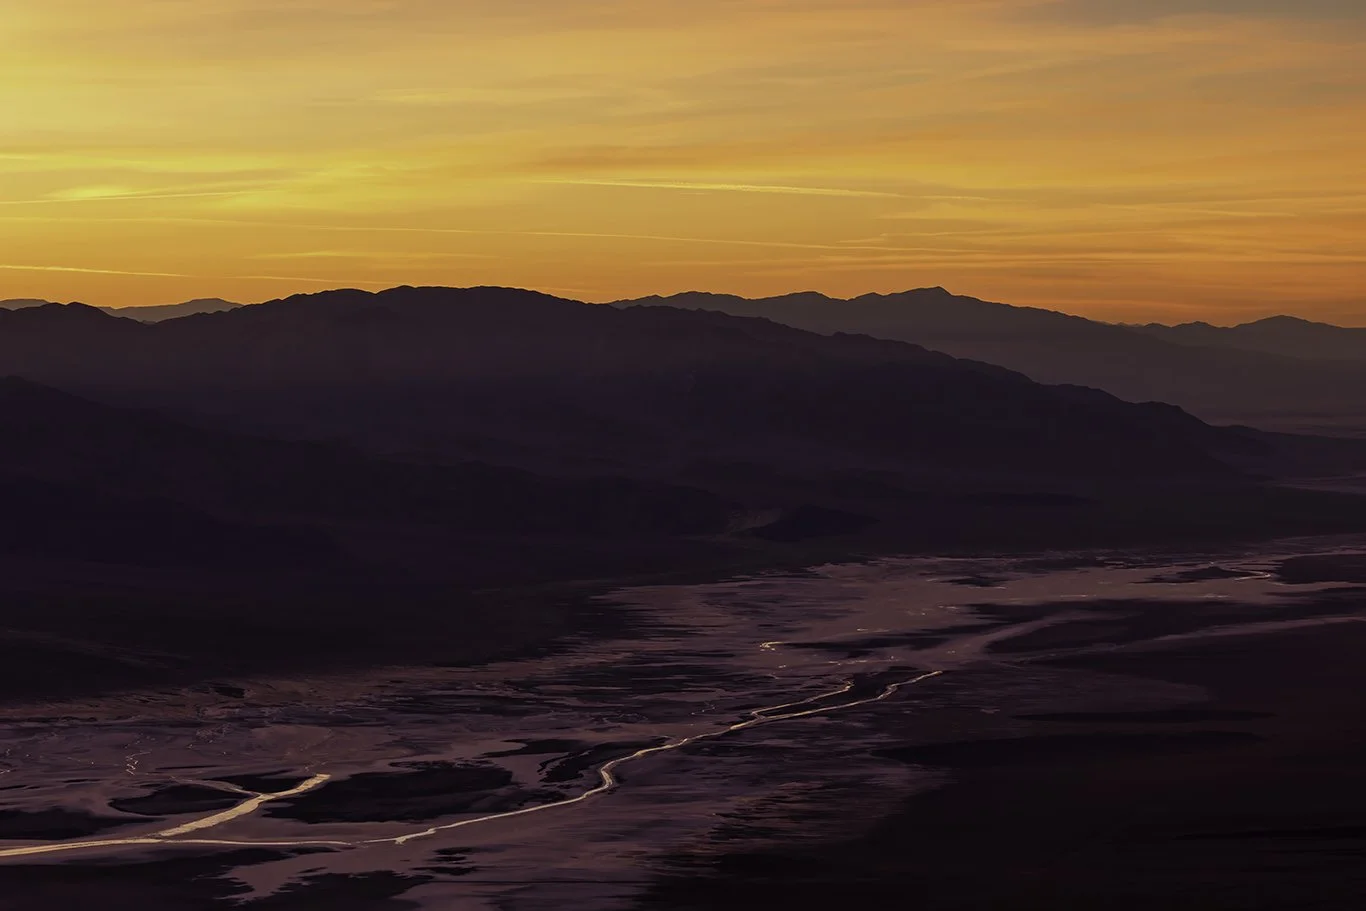
The topography of this area is amazing. From our perspective, we see tiered geomorphic surfaces and nearby steep Black Mountains slopes. To the west lie the flat Badwater playa and the rising Panamint Range. The valley below collects sediments from the surrounding ranges, which have coalesced over time into alluvial fans and playa deposits. During the Pleistocene era, wetter intervals produced larger lakes on the valley floor. As the climate became hyper-arid, evaporation led to salt-crust development. The net result is what we see today, with opportunities for wide-angle panoramas and foreground-to-distant detail, as well as telephoto shots for compressed layers and isolated mountain bands.

My time in Death Valley is coming to a close. In five days, we’ve covered many of the highlights this great park offers. However, I realize there’s so much more I haven’t seen. I’ve had the same feeling when I’ve left many other places around the world during my travels. When I get home, I will finish processing my photos, update my website, and start planning my next trip.

Waterfall Photography, a Primer

So you enjoy traveling and have developed an interest in photography. Congratulations! Few pursuits are as emotionally and intellectually engaging. I’ve been doing this for many years, and during my travels, I’ve found waterfall photography to be incredibly inspiring, combining the awe of experiencing nature with the challenge of mastering the skills needed to capture these breathtaking sights. Let’s go on a journey around the world and pick up some photography tips along the way.

Getting Started-Gear Basics for Waterfall Photography

The first decision to make is which camera to choose. Today, many manufacturers are available. While Canon and Nikon dominated the DSLR market for years, SONY rose to the top with the growth of mirrorless cameras. However, the best camera for a waterfall photographer is one that can handle long exposures and has a high dynamic range. The ideal camera for beginners should have simple manual controls, interchangeable lenses, a large sensor, a strong autofocus system, built-in Wi-Fi or Bluetooth, good battery life, and a RAW shooting mode. Other notable mirrorless cameras include models from Fuji, Panasonic, and Lumix.

Victoria Falls, Zimbabwe, Africa

The Victoria Falls straddle Zambia and Zimbabwe along the Zambezi River in Africa, and are the tallest waterfalls in the world.

Choosing the best lenses for waterfall photography

Choosing the right lens is vital in waterfall photography. A wide-angle lens in the 16-35mm range is ideal for capturing the broad scope of landscapes and waterfalls. These come as Wide-Angle Zooms, which provide versatility, and Wide-Angle Primes, known for their sharpness. While both offer wide views, I prefer the Zoom for its convenience. Sometimes, a longer lens like 70-200mm can produce better results for creating unique compositions. Also, factors like inaccessibility or the distance to the waterfall may make a long lens more suitable. Telephoto lenses give interesting perspectives by compressing the scene and highlighting specific landscape features.

What are the best tripods for waterfall photography?

Having a tripod for waterfall photography is an essential piece of equipment. Once you recognize this, choosing the right tripod is crucial for handling the unpredictable elements typical of most waterfall settings. Considerations include stability, durability, and portability. The tripod must be sturdy enough to withstand slippery rocks and rushing water.

How to choose the right tripod

Many waterfalls are often difficult to access, requiring challenging hikes to reach them. Therefore, a tripod should be sturdy enough to support your camera but also compact and lightweight for easy transportation. A good option is a tripod made of carbon fiber, which resists rust and corrosion in moist environments. Sadly, high-quality tripods can be costly, but they should be viewed as an investment that will enhance your images and withstand tough environmental conditions.

A sturdy tripod allows you to use long exposures, which are essential to turn a wild torrent into a soft, dreamy curtain. Experiment with different shutter speeds to ensure every detail remains sharp and clear. This provides you with the creative freedom to produce various artistic effects, from gentle blurring to striking, milky water flows.

Filters are essential gear for waterfall photography

Iguazu Falls, Brazil at Sunset

This image was captured of the Iguazu Falls on the Brazilian side at sunset.

ND Filters (Neutral Density Filters) are essential tools for waterfall photography. They reduce the amount of light entering the lens, enabling you to use slower shutter speeds even in bright daylight. This allows you to achieve long exposure effects without overexposing your image, creating smooth, flowing water and artistic motion blur effects. ND filters are classified by their optical density, which indicates how much light they block and is measured in stops. Common types include ND3, ND6, and ND10 filters, each permitting less light to pass through.

Circular polarizing filters are vital for managing reflections and enhancing the vibrancy of your scene. They selectively filter polarized light, significantly decreasing glare from water and wet surfaces. This improves the clarity and color of the water and surrounding vegetation. By increasing color saturation, these filters make greens and blues appear more vibrant, resulting in a more lively overall image. The circular polarizer can be rotated, providing adjustable polarization strength for greater flexibility and control over your shot.

A remote shutter release is important in waterfall photography.

To prevent camera shake when pressing the shutter button, a remote shutter release is an essential tool. It eliminates vibrations caused by pressing the shutter button, helping to capture sharp images free from blurriness due to hand movement. There are two useful options for releasing the shutter. The first is a remote control, like the Vello Free Wave Plus, which connects to the side of the camera. However, it can be tricky to use with an L-bracket, which attaches your camera to a tripod in both portrait and landscape modes. Therefore, I usually rely on the two-second timer on my camera. I trigger the shutter from my phone to avoid touching the camera, and for exposures longer than thirty seconds, I shoot in bulb mode, using the timer on my phone to monitor the exposure time.

What are the best camera settings for waterfall photography?

DSLR and mirrorless cameras are perfect for capturing waterfalls. By adjusting the shutter speed, aperture, and ISO settings, you can control how silky and smooth the falling water appears. These adjustments are easiest to manage in your camera’s manual mode. The first decision you need to make is the shutter speed. Using a slow shutter speed—ranging from 1/4 second to several seconds—can create a smooth, misty effect on the water. On the other hand, if you want to capture the power of the flowing water, a faster shutter speed of around 1/500 second or more might be better. Next, consider the aperture size. To achieve sharp focus throughout the scene when photographing waterfalls, you should choose a smaller aperture, which provides a larger depth of field. An aperture setting of f/8 to f/16 is recommended for this. Lastly, set the ISO, which controls your camera’s sensitivity to light. Keeping the ISO low, around 100 to 200, helps prevent noise in your images and keeps them clear and grain-free.

This shot was taken in Iceland of the Aldeyjarfoss Waterfall. By using a shutter speed of two seconds, the water appears ethereal and silky smooth.

What are the best lighting conditions for waterfall photography?

Like all types of photography, the lighting conditions you shoot in will significantly shape the appearance of your waterfall photos. Therefore, it’s important to plan carefully for the best times and techniques to capture your images. Overcast days help minimize harsh shadows and blown-out highlights. However, on cloudy days, soft, even lighting is perfect for highlighting the water’s texture and the surrounding landscape. On sunnier days, aim to shoot during the golden hour, which is typically the hour after sunrise or before sunset. The low-angle light gently highlights the scene, accentuating textures and creating attractive reflections. Usually, avoid shooting in direct midday sun, as it can cause harsh shadows and blown-out highlights. However, these conditions might be suitable for infrared photography.

This is one of the multiple waterfalls in Plitvice, Croatia.

This is one of multiple waterfalls in Plitvice National Park in Croatia. The overcast sky made for soft, even lighting.

Compositional considerations in waterfall photography

Creating an aesthetically pleasing composition is the goal of every photographer. When you approach a waterfall, your first consideration should be achieving proper framing and balance. When arranging elements within the shot, there needs to be a clear focus on the waterfall. Work to combine foreground, midground, and background elements to add depth and interest to your photograph. You also want to make sure that a backdrop is chosen that enhances rather than detracts from the composition.

Work with the classic principle of the Rule of Thirds. By enabling the grid feature on your camera, it becomes easy to align and balance important elements within the frame. Look for unique angles. Sometimes, finding higher ground to shoot from can give you a sweeping view. Getting close to the water can often provide a dramatic angle. Also, incorporating elements such as rocks or foliage can help frame the shot. Changing your position can often produce a new, less common perspective.

Try to capture shots that are close to the water’s surface. Shooting low can create a sense of immersion, making the viewer feel part of the scene. Aim to capture reflections to create a symmetrical effect. Low angles can also emphasize motion and the waterfall’s power.

Yosemite Waterfall, Yosemite National Park

This photograph of Yosemite Waterfall was shot in the spring after a significant period of rainfall. The rule of thirds is operative here together with framing by rock and vegetation.

Miscellaneous Tips for Better Waterfall Photography

There are several techniques to make your waterfall photography more engaging for viewers. Including people or wildlife in your shots can provide scale, helping viewers appreciate the size and power of the waterfall. Taking panoramic shots can display the expansive landscape surrounding the waterfall.

Other factors to consider include the weather on the day of your shoot. It's useful to know if rain is predicted and what the lighting conditions might be. Even if it’s not raining, wearing waterproof boots and carrying a rain cover for your camera bag can be helpful. Additionally, having a fiber cloth to wipe your lens if it gets wet from rain or waterfall spray is essential.

Fairy Pools on the Isle of Skye, Scottish Highlands

The Fairy Pools on the Isle of Skye in the Scottish Highlands

The Wrap up

Few experiences in my time as a travel photographer have been as enjoyable as waterfall photography. Being surrounded by unspoiled natural beauty is truly inspiring and a complete joy. Beyond appreciating the aesthetic elegance of these natural structures, learning to master the photographic skills needed to bring your vision to life is a journey I highly recommend.


Discovering the Cove Hardwood Trail and Morton's Overlook in Great Smoky Mountains National Park

We are on the third day of our adventure in the Great Smoky Mountains National Park, and our schedule is packed. We’ve already visited Foothills Parkway in the morning and Tremont Bridge in the early afternoon. Now, we are loading our camera gear into our vehicles and heading to the Cove Hardwood Trail for macro photography and breathtaking landscape opportunities. After that, we will proceed to Morton’s Outlook to capture sunset photographs, which could be spectacular if the conditions are right.

The Cove Hardwood Trail winds through a lush, protected cove, a haven for diverse hardwood species that thrive in the park’s rich, moist environments. Historically, this area served as a vital resource for early settlers by providing timber and other forest products. Today, the trail offers visitors a glimpse into the region's natural history, featuring ancient trees that have shown ecological resilience over the centuries.

As we walk along the trail, we encounter numerous opportunities for macro photography. Sometimes, being in the right place at the right time is crucial for executing a great shot. This was the case for me when I was framing a photograph of a leaf, when a bug landed on its surface. I positioned myself on the ground to find the best angle and successfully captured the moment.

As the afternoon progresses, the sun filters through the forest, and we arrive at a beautiful stream. In the distance, a tall tree is naturally framed by the inward-bowing branches of the trees in the midground. However, while my eyes can perceive the full dynamic range of the scene, my camera cannot capture all of it in a single exposure. To remedy this, I take five exposures at one-stop increments. I plan to combine these images in post-processing to create a final photograph that properly represents both the darkest shadows and the brightest highlights. I love how this photograph turned out!

Once more, we pile into the van and head to Morton’s Overlook as the sun sets. This popular viewpoint offers astonishing vistas of the Smokies’ ridges and valleys. Named after hikers or early conservationists, it stands as a testament to the park’s ongoing preservation efforts. As luck would have it, the light this evening is perfect, creating a fantastic interplay of light and shadow over these centuries-old mountains. This sunset shot is iconic!

The sun sets, and it is now time for a beer and some dinner. Frankly, I'm exhausted, and better get some sleep so that I will be ready for our morning shoot. That’s okay. When these five days are over, i will get a vacation from my vacation.


Exploring Infrared Photography in the Great Smoky Mountains National Park

It’s 2025, and after a hiatus from photography trips, I made arrangements to visit the Great Smoky Mountains National Park. The trip is organized through Muench Travel, with two professional photographers leading our excursion. In anticipation of the journey, I was advised to bring an extra camera as a backup in case my mirrorless camera fails. I went into a drawer and pulled out an old Canon DSLR I hadn’t used in several years. I decided to send it to LifePixel to have it converted to infrared, which I believed would add a new dimension to my photography.

Infrared photography captures light beyond the visible spectrum. Shooting in IR reveals a surreal world, with green foliage glowing white, skies turning dark, and textures intensifying. This results in images that possess a dreamlike, otherworldly quality. Landscapes convey an ethereal feel, making familiar scenes appear extraordinary.

I’ve discovered that manual mode is best for more precise control while shooting in IR. The exposure times are longer, making the use of a tripod important. Additionally, using a custom white balance with green foliage as the subject yields the best results.

I have also discovered some post-processing considerations for IR photography. The images benefit from increased contrast in the skies and foliage. Converting an infrared image to black and white makes it easy to emphasize textures. This can be achieved by adjusting levels or curves to deepen blacks and brighten whites. By fine-tuning the tonal range, the surreal quality of the image can be enhanced. Boosting clarity in LightRoom or Photoshop helps bring out the texture in foliage, bark, or clouds, giving an IR image a pleasing, detailed look. Selective brightening or darkening can be accomplished with dodge or burn tools. Ensuring the histogram displays a full tonal range from black to white is vital to presenting a balanced image.

I would have to say that doing some IR shooting in the Great Smoky Mountains allowed me to see the landscape through a new lens-quite literally! It challenges you to think differently about light and composition, turning ordinary scenes into magical visions. It provides an adventure of discovery, captivatingly mixing technology and art.

Sunrise at Oconaluftee Overlook

It’s 4:00 AM when my alarm goes off in the motel where we’re staying in Gatlinburg, Tennessee. I bolt out of bed, brush my teeth, gather my camera gear, and head to the parking lot, where Matt and Luke, the professional photographers from Muench Travel, are ready for our early morning shoot.

The drive to the Great Smoky Mountains National Park isn’t too far. However, this morning's destination is the Oconaluftee Overlook, approximately one hour away. Our goal is to arrive there for sunrise, the optimal time to see the scenic clouds and fog in the valley, a favorite spot for photographers. I wish I were a little more awake.

We arrive in the dark, with dawn only minutes away. This gives us a brief moment to identify the best vantage points to set up our cameras and tripods. Additionally, we need time to experiment with wide-angle and telephoto lenses to capture the essence of this scene’s grandeur.

I’ve been checking the weather apps frequently. There’s a chance of rain that could ruin everything. However, so far, so good. The sky appears threatening, but is, in fact, cool!

As soon as there is enough light, we start shooting. Initially, the clouds are thick, blocking any sunlight. It looks fine, but not impressive enough to write home about. However, things will change by the minute, so I keep shooting.

The name “Oconaluftee” derives from the Cherokee language, meaning “by the river of the Ocoee” or “by the river of the river people.” This area holds historical significance for the Cherokee Nation, as it was part of their ancestral lands and features the Oconaluftee River, which flows through the region.

Some time has elapsed, and I now see the sunlight beginning to peek through the clouds. This scene is becoming more captivating. A combination of temperature and humidity factors primarily creates the clouds and fog at sunrise in the valley. In the early morning, cooler air settles into the valley, chilling the moisture-laden air near the ground. When the moist air meets the cooler ground, it condenses, forming fog and clouds that hover over the valley. Moreover, the surrounding mountains act as barriers, trapping moist air and fostering the formation of low-hanging clouds and fog. The interaction among these elements, especially during clear nights with rapid cooling, creates the stunning, ethereal views that make Oconaluftee Overlook a favorite spot for photographers.

No more than ten minutes have elapsed, and I now see a spectacular combination of sunlight, fog, and clouds in the valley. I capture multiple frames; I suspect one will be good enough to print.

Our shoot is now complete, and it is time for breakfast. We pile into the van with our equipment in the back and head to the restaurant. While Matt and Luke study the weather patterns to help them determine our next shoot, I can only think about another cup of coffee, eggs, and toast. I certainly hope our next venue will be on par with the Oconaluftee Overlook.


An Adventure in the Great Smoky Mountains National Park

I had traveled the world since the 1970s, but began focusing on visiting the National Parks in the U.S. as international travel became more challenging. This situation worsened when the pandemic hit in 2019, along with other factors, resulting in a hiatus from travel. However, in 2024, I saw an advertisement for a photographic trip to the Great Smoky Mountains National Park. I paid my deposit, gathered my camera gear, and visited this national treasure for five days in 2025.

Nestled along the border of North Carolina and Tennessee, the Great Smoky Mountains National Park is a sanctuary of natural beauty and rich history. As one of the most visited national parks in the United States, it offers a spectacular blend of lush forests, cascading waterfalls, and rugged mountain terrain, making it a photographer’s paradise.

In 1934, the U.S. government decided to preserve this diverse ecosystem with a cultural heritage rooted in Native American history and early Appalachian settlements. Its name comes from the smoky haze created by the natural fog that often drifts through the mountains during early mornings and evenings. Over the decades, it has attracted millions of visitors eager to explore the park’s scenic vistas.

The first thing that struck me as we cruised through the park in our van packed with all our photographic equipment was the rolling mountains, deep valleys, and dense hardwood forests. We ascended to Clingman’s Dome, the highest point in the park at 6,643 feet, which offered incredible panoramic views. We also took in numerous waterfalls, too many to count, including the cascading falls along Roaring Fork.

Over five days, we explored the park’s scenic spots. The West Prong Little River was a tranquil spot with crystal-clear waters flowing over rocks and through lush foliage, creating serene compositions. The Oconaluftee Overlook, one of my favorites, offers breathtaking views of the mountain ranges and the lush valley below, making it perfect for capturing the vastness of the Smokies. Chimney Tops, renowned for their challenging ascent and iconic jagged peaks, provide dramatic backdrops, particularly at sunset when the peaks radiate a warm light. Clingman’s Dome has an accessible observation tower atop the highest peak, offering panoramic views of the mountains and forests. Foothills Parkway is a scenic drive that winds along ridges and offers numerous pull-offs for capturing breathtaking mountain vistas and distant horizons. Cove Hardwood Trail is an inviting path winding through dense hardwood forests and open meadows, abundant with wildflowers and birdlife. Morton’s Overlook provides sweeping views to the east of the mountains. Cade’s Cove is a historic valley famous for its abundant wildlife, picturesque barns, and fertile fields. Roaring Fork Interpretive Drive is a scenic loop showcasing historic cabins, farmstead buildings, and waterfalls along Roaring Fork Creek. Newfound Gap is a mountain pass that offers breathtaking vistas and provides access to trails leading into the heart of the Smokies.

Walking through these diverse locations, I felt immersed in the raw beauty of the rushing waterfalls, towering peaks, and tranquil forests. Each spot has its own story; capturing these moments with my camera was a rewarding part of my adventure, which I will explore further in upcoming blog posts.

Exploring Venetian Gardens: A Cultural Landmark in Central Florida

I moved to Central Florida in 2012 to join a cardiology group in The Villages. One of the hospitals that I made rounds on was the Leesburg Regional Medical Center, a large tertiary care hospital. Being very busy with work, I barely noticed signs down the road pointing to Venetian Gardens. After several years, while on a day off, I drove to Leesburg, followed the signs, and eureka, I hit the jackpot! I entered Venetian Gardens, a vibrant cultural oasis that captivates visitors with its stunning landscapes, rich history, and undeniable charm.

This beautifully designed garden, with its intricate waterways and lush flora, is a testament to the area’s historical growth, a vital gathering spot for the community, and a key player in Central Florida’s tourism landscape. As a photojournalist who has wandered its paths countless times, I have seen the significance of Venetian Gardens as a cultural landmark and recreational haven.

 The story of Venetian Gardens dates to the mid-20th century when the city of Leesburg began developing its public spaces to enhance the quality of life for its residents. During this period, the city embraced the design inspiration of Venice, Italy, which is evident in the gardens' architecture and landscaping. The visionary leaders of the time understood the importance of creating an attractive environment that could foster community spirit and draw visitors to the area.

The gardens were officially established in the 1930s to create a beautifully landscaped park that showcased Central Florida's natural elements. Various enhancements and restorations were made as time passed, resulting in a captivating blend of natural beauty and artistic design that still enchants visitors today.

Venetian Gardens is not just a park but a vibrant cultural landmark embodying the community's spirit. Its scenic beauty and diverse facilities host numerous events, including art shows, festivals, and seasonal celebrations. This role as a community hub fosters social interaction and brings people together, reinforcing a sense of belonging among residents.

Nearly every weekend, the gardens come alive with the laughter of families enjoying picnics, children playing in the open grassy areas, and couples walking together along the picturesque pathways. The gardens host various local events, from farmers’ markets to public concerts, further solidifying the community's importance as a place to gather and connect.

Venetian Gardens attracts visitors from all over, significantly contributing to the local tourism industry. As tourists flock to the gardens, they soak in the stunning views and invigorate the local economy. Nearby restaurants, shops, and accommodations benefit from the influx of visitors seeking to experience the charm of Leesburg.

The gardens’ reputation as a picturesque destination for strolls, family outings, and professional photography sessions has made them a must-visit spot in Central Florida. As a photojournalist, I have often found myself captivated by their unique features—from the serene lakes to the vibrant flower beds—which provide endless opportunities for artistic expression.

One of the most appealing aspects of Venetian Gardens is its role as a recreational space. With walking paths, picnic areas, and beautifully landscaped areas, it provides an ideal environment for outdoor activities. Families can enjoy a day of fun amidst nature, while fitness enthusiasts find solace in the tranquil surroundings as they jog along the extensive trails.

The gardens also emphasize the importance of family bonding, offering spaces where children can engage with nature and learn through hands-on experiences. This aspect cultivates a sense of appreciation for the environment, instilling a love for nature in the younger generation.

Venetian Gardens is not only a beauty spot but also an ecological asset. It is home to various native plants and wildlife, which are crucial in preserving local biodiversity. By promoting the growth of native species, the gardens contribute to a balanced ecosystem and encourage environmental stewardship within the community.

Moreover, the gardens' design incorporates sustainable practices, such as rain gardens and native landscaping, which help manage stormwater runoff and protect the local waterways. These efforts highlight the importance of preserving natural habitats while creating a beautiful, enjoyable space.

The alluring landscapes of Venetian Gardens have inspired countless artists, photographers, and nature enthusiasts. The interplay of light and water, the vibrant colors of flowering plants, and the tranquil settings provide a rich tapestry for creative expression. Artists often set up their easels and capture the beauty of the gardens in paint and photography, helping to bring attention to the area's natural splendor.

Photographers, including myself, find the gardens an endless source of inspiration. Each visit reveals new angles, lighting conditions, and seasonal changes, allowing for an ever-unique photographic experience. I regularly experiment with various lenses, a practice that has made me a better photographer.

Amazingly, I was so consumed with work that I missed this gem for years. Instead of living in a tight cocoon, I’ve learned that opening my eyes to see what the world offers is a good idea. Who knows what undiscovered jewel is lurking around the corner? 

The Nauset Lighthouse in Early Morning Light

It’s 6:00 AM this mid-October morning, and Bob, my fellow outdoor photographer, picks me up at home. Today, we are venturing out in the dark to capture the best light at the Nauset Lighthouse. This trip to Wellfleet, Cape Cod, will take about an hour, but photographing this iconic structure at sunrise will be well worth it.

We park the car just as the sun peeks from the horizon. The Lighthouse is the first thing that comes into view in all its glory. In addition to the allure of its presence at the top of a moderately steep hill, this red and white monolith looks out over the ocean, a serene site to behold.

Built in 1838, the Nauset Lighthouse has stood sentinel over the Cape Cod coastline for nearly two centuries. Originally constructed to guide mariners safely past the treacherous waters, the lighthouse has grown to embody the region’s spirit. However, the story of Nauset Lighthouse is not simply one of standing tall against stormy seas; it’s also about resilience and preservation.

The coastline has been steadily eroding, and the lighthouse faced the threat of being washed away. In a monumental relocation effort, Nauset Lighthouse was moved 1500 feet inland in 1996. This engineering feat preserved the historic structure and ensured it would continue to serve as a navigational maritime traffic beacon.

With its iconic red and white color scheme, adopted in 1955, Nauset Lighthouse has become an emblematic symbol of the Cape Cod landscape. Today, the lighthouse, operating with its original third-order Fresnel lens, glows brightly for mariners, visible from approximately 13 nautical miles. Furthermore, its listing on the National Register of Historic Places underscores its significance as a lighthouse and a piece of American maritime heritage.

While standing before the Nauset Lighthouse, I couldn’t help but feel a sense of connection to the tales of those who lived and and worked here. Local lore speaks of the “ghost” of a former lighthouse keeper who is said to roam the grounds, perhaps keeping watch over the seas he once guarded. Whether accurate or simply the result of an overactive imagination, these stories deepen the lighthouse’s charisma and charm.

Nauset Lighthouse has certainly weathered its fair share of storms, literally and figuratively. During fierce winter storms, waves crash dramatically against the cliffs, often sending sprays of water up toward the lighthouse. Photographers over the years have captured these explosive moments, as the juxtaposition of nature’s fury with the steadfast lighthouse creates breathtaking imagery.

The reach of Nauset Lighthouse extends far beyond its physical location. It has appeared in various films, artwork and photography. The lighthouse has been part of Cape Cod’s cinematic landscape in films such as The Finest Hours, which depicts the bravery of the Coast Guard during treacherous rescues.

Nauset’s picturesque setting has long enamored artists and photographers. As depicted in the this post, many famous paintings and photographs showcase the lighthouse, especially during the golden hours of sunrise and sunset. Its striking silhouette against vibrant skies serves as an enduring image of the Cape.

One intriguing aspect of lighthouse lore is the Great Lighthouse Debate, which stems from Edward Hopper’s famous painting Nighthawks. Some enthusiasts speculate whether the emotional ambiance of Hopper’s diners was inspired by the isolation often associated with lighthouse life. This debate adds another layer to the connections between lighthouses and American art and culture.

As I wander around the base of Nauset Lighthouse, I reflect on the lives of lighthouse keepers and their families. These guardians of the sea lived in relative isolation, dedicated to the upkeep of the light and often dealing with the challenges of culinary and domestic life amidst the unpredictable weather. Many local accounts describe the close-knit communities formed around these lighthouses, creating a unique culture centered on maritime traditions.

At this point, the good light for photography is gone, and it is time to travel a short distance to the Mass Audubon Wellfleet Bay Wildlife Sanctuary for bird photography. The hope is that many of the migratory birds have not yet left for the season. It’s windy today, which could also hinder our chances for getting good bird photographs. Nevertheless, as long as we’re here, it’s certainly worth a try. Not to worry; if no luck, I know I’ll be back here in the future.

Early Morning at the Scituate Lighthouse and Harbor

It’s 6:15 AM on this cool and crisp October morning in Plymouth. MA. I pick up Bob, my friend and avid outdoor photographer for a trip up Boston’s south shore to the Scituate Lighthouse and Harbor. It’s after Labor Day, and the tourists are nowhere to be seen. We’re excited!

I park the car, and the first order of business is to stroll around the lighthouse looking for good light and perspectives for optimal compositions. We grab our equipment and split up while we capture our images.

Nestled along the rugged Massachusetts coastline, this stunning landmark tells the story of maritime navigation and serves as a cherished symbol of the community. In this post, we’ll explore the the Scituate Lighthouse’s history, architectural beauty, and serene atmosphere at dawn.

Built in 1810, this structure is a testament to America’s maritime heritage. Commissioned by the federal government, its primary purpose was to enhance navigation along the Massachusetts coastline and guide vessels safely into Scituate Harbor. The lighthouse, constructed from locally sourced granite, was strategically placed atop a rocky outcrop to maximize visibility for approaching ships.

As the harbor became increasingly vital for trade and commerce, this lighthouse reduced maritime accidents and ensured safe passage. Over the years, maritime trade flourished, thanks partly to the steadfast light from the iconic tower.

Over its two centuries of service, Scituate Lighthouse has been a silent witness to significant historical events. During the War of 1812, it served as a lookout point against potential threats, ensuring the safety of the coast. In 1933, the lighthouse was automated, marking a shift towards modern navigation and systems that reflected technological advancements. Despite these changes, the lighthouse has preserved its charm and historical significance, remaining a beloved landmark for residents and visitors alike.

The architectural design of Scituate Lighthouse is a classic representation of early 19th-century lighthouse construction. Standing tall at 70 feet, its cylindrical shape tapers slightly as it ascends, providing both structural integrity and an aesthetically pleasing silhouette. Made of durable granite, the lighthouse is a robust landmark resilient to relentless coastal elements.

Above the tower, the lantern room houses the beacon, traditionally illuminated by a Fresnel lens, which allowed for efficient and far-reaching illumination. The light has been modernized today, but it continues to serve as a vital navigational aid. The rotating light can be seen from miles away, guiding sailors safely to shore as they navigate the challenging waters of the Atlantic.

Across from the lighthouse is Scituate Harbor where boats are just starting to take off in this early morning hour. The shoreline is a striking landmark that symbolizes resilience, history and community pride. The sandy beaches and historic homes create a picturesque coastal

environment that draws tourists, artists and photographers. At sunrise, the lighthouse emerges from the morning haze, casting a long shadow across the rocks and illuminating the serene waters below.

The sun is getting higher in the sky now signalling the end of the good light for creating stunning images filled with depth and warmth. Bob and I wrap it up, and we head back to Plymouth. I love lighthouses, and I have accumulated an impressive list of sites worthy of a visit. I keep my fingers crossed for good weather as winter approaches.

A Glencoe Emergency in the Scottish Highlands

We’ve taken the ferry from the Isle of Lewis and Harris to the mainland of the Scottish Highlands. It is time to explore Glencoe, a village situated in the steep-sided Glencoe Valley. This is the third leg of our tour, complete with numerous sites to explore and photograph.

After a trip to the visitor center, we are now more acquainted with this glen of volcanic origins. Situated between the county of Argyll and the province of Lochbar, this is an expansive area that is ideal for mountaineers, hill walkers, and climbers.

As we meander through The Glen, we come across a black cottage on a steep hillside. The sky appears threatening, but it is not yet raining for a change. This hut seems isolated from the rest of the world, nestled amongst numerous small mountains, typical for the Scottish Highlands.

Named after the River Coe, The Glen has been described as “soaring and dramatic,” by Scottish Natural Heritage, and is noted for its transition between “high mountain pass and lightly wooded strath.”

Continuing with our journey down route A82, we come to an impressive area known as the Three Sisters. A beautiful green valley abuts a series of imposing mountains, and I feel like this is a magical land out of a medieval storybook. The Three Sisters are known as Bidean nam Bian Mountain in Gaelic and have a yellow-brown appearance in October.

It’s getting later in the day, so we keep moving right along to an area known as The White House. It is quite overcast, but there is no precipitation. This scene is idyllic with small waterfalls in the foreground, the white house in the mid-ground, and mountains in the background. I get several different compositions and settle on one as shown here.

Our group leader, Don, says it’s time to pack it in. We head back to the bus, with one site left on the day’s itinerary. Some time passes, and we are not moving. There is no sign of Don, and the remaining daylight is starting to fade.

Eventually, Don returns to the bus to let us know that an incident has occurred. It turns out that a man who had parked his car next to the bus had hiked up the mountain with his eleven-year-old son and eight-year-old daughter.

The daughter suffers from asthma and began having an acute asthmatic attack. The father sent the son down the mountain to look for the daughter’s inhaler in the car. That was when Don found him rifling through the vehicle, with the inhalers nowhere in sight. The little boy was distraught!

Don comes on the bus to let us know that we will not be making it to the last site of the day. He turns his attention to me, a cardiologist, to get some medical advice on how to handle this situation. This is complicated. We can’t see the father and daughter up the mountain. Even if they were accessible, a full blown asthmatic attack would require inhalational bronchodilators and/or intravenous steroids.. My advice is to call 911 which is 999 in Scotland.

An ambulance is called, and the rig shows up in forty-five minutes. During this time, Barbara, one of the clients on this tour and a retired emergency room nurse, brings the boy on the bus. She keeps him occupied by asking questions about where he goes to school, has this happened to his sister before, does his family do a lot of hiking, etc.

Finally, we see the father carrying the daughter on his shoulders down the incline. He eventually makes it to the bus, and the ambulance driver takes over. I can see that the girl is wheezing, but probably will not need steroids, and does not need to be intubated.

We head back to the hotel and straight to the bar. This has been exhausting, but what was done was worthwhile. It’s obvious that despite being a photographer, I can never stop being a medical doctor. I hope tomorrow ends more smoothly!